Battery switch on travel trailer function is crucial for managing your RV’s power. Understanding how to use your battery switch correctly is key to extending battery life, preventing electrical issues, and ensuring a smooth camping experience. This guide covers everything from basic operation to troubleshooting common problems and maintaining your system for optimal performance.
We’ll explore different types of battery switches, safe connection and disconnection procedures, and how the switch interacts with other electrical components like inverters and converters. We’ll also dive into troubleshooting tips for common problems and preventative maintenance to keep your system running smoothly for years to come. Get ready to become a battery switch pro!
Understanding Battery Switch Functionality in Travel Trailers
Your travel trailer’s battery switch is a crucial component for managing power, protecting your batteries, and ensuring efficient energy use. It allows you to disconnect your house batteries from the trailer’s electrical system, preventing battery drain when the trailer isn’t in use and protecting your batteries from damage. Understanding its function and operation is key to maintaining your RV’s electrical system.
Battery Switch Types
Travel trailers typically utilize several types of battery switches. The simplest is a single-pole, single-throw (SPST) switch, which simply connects or disconnects the battery from the trailer’s electrical system. More common are dual battery switches, allowing you to isolate two separate battery banks (for example, one for house power and another for starting the tow vehicle). These often come in dual-pole, dual-throw (DPDT) configurations, offering more control and flexibility.
Some high-end trailers even incorporate more complex systems with multiple switches or integrated battery management systems.
Operating a Battery Switch
Proper operation is straightforward, but understanding the switch’s labeling is essential. Before operating any switch, always ensure the power to your trailer is off. Locate your battery switch, typically near the batteries themselves or in a convenient access panel. Most switches have clear markings indicating the “on,” “off,” and sometimes “both” or “combined” positions. To turn on your house batteries, move the switch to the “on” position.
To disconnect them, move it to the “off” position. If you have a dual battery system, each battery bank will have its own switch or section on the switch, allowing for independent control. Always refer to your trailer’s owner’s manual for specific instructions on your model’s switch.
So, you’re an audiophile who loves to travel? Awesome! Check out this guide on creating the perfect audiophile travel setup to ensure your ears are happy on the go. Remember, protecting yourself is key, too. Before you jet off, make sure you’ve got solid travel insurance sorted; I recommend looking into Aon travel insurance for comprehensive coverage.
With great sound and peace of mind, your trip is sure to be amazing!
Advantages and Disadvantages of Battery Switch Designs
The choice of battery switch depends on your needs and the complexity of your electrical system. A simple SPST switch is inexpensive and easy to use, but it only offers basic on/off functionality. Dual battery switches provide greater flexibility, allowing you to isolate batteries for maintenance or prevent parasitic drain on one bank while using the other. However, they are more complex and slightly more expensive.
So, you’re an audiophile who loves to travel? Awesome! Check out this guide on creating the perfect audiophile travel setup to ensure your tunes sound amazing wherever you go. It’s all about packing smart and choosing the right gear. Then, before you jet off, remember to sort out your travel insurance; securing Aon travel insurance is a good idea for peace of mind, covering any mishaps with your precious equipment.
Enjoy the journey and the music!
More advanced systems, while offering sophisticated control and monitoring, increase cost and complexity, potentially requiring professional installation. For example, a simple SPST switch might be sufficient for a small trailer with a single battery, while a dual battery system is recommended for larger trailers with multiple batteries and separate systems for house power and starting. Consider your trailer’s size, features, and electrical system complexity when selecting the appropriate switch.
Connecting and Disconnecting Batteries
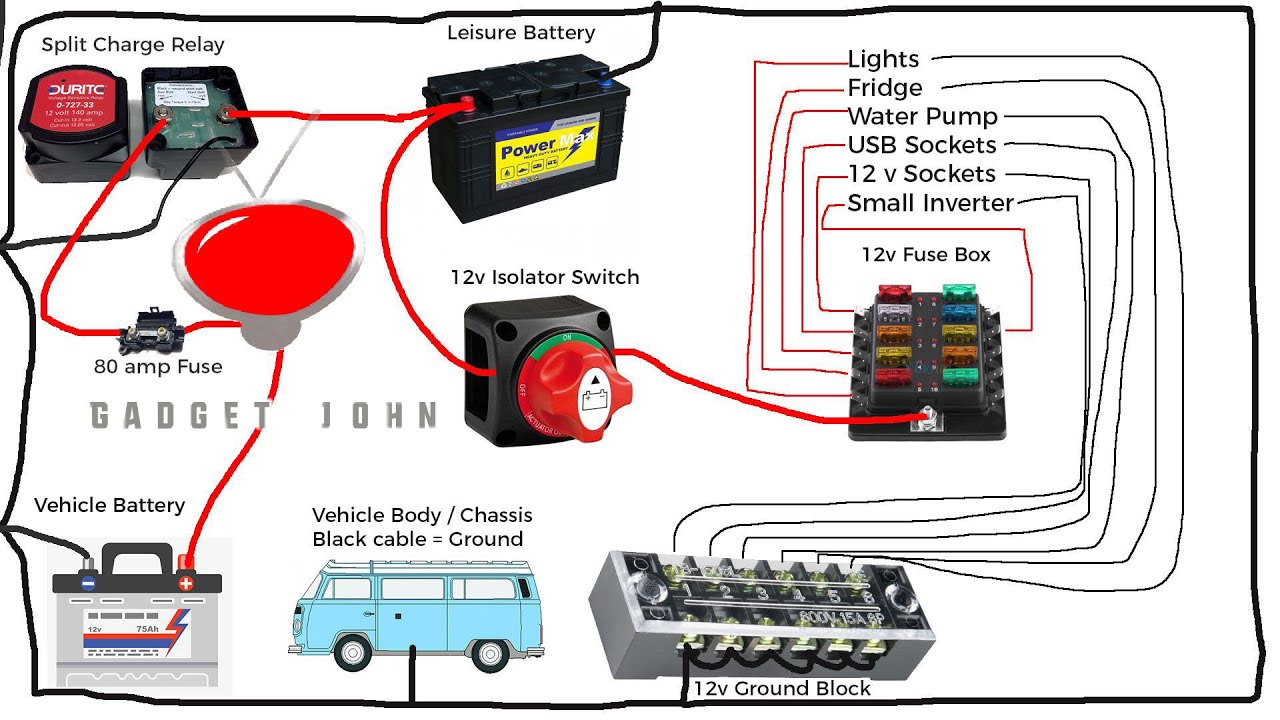
Connecting and disconnecting your travel trailer’s batteries correctly is crucial for safety and to prevent damage to your electrical system. This process usually involves a battery switch, allowing you to isolate the house battery (powering your interior lights, appliances, etc.) from the chassis battery (powering your vehicle’s starting system). Improper handling can lead to electrical shorts, battery damage, or even injury.Properly connecting and disconnecting your batteries involves understanding your battery switch and following a safe procedure.
This ensures your RV’s electrical system remains functional and prevents potential hazards.
Battery Connection and Disconnection Procedure
To connect or disconnect the house battery from the chassis battery, you’ll typically use a battery switch. These switches usually have multiple positions, allowing you to select different configurations. Before you begin, always ensure the switch is in the “OFF” position. Then, carefully move the switch to the desired position, ensuring it clicks securely into place. Consult your RV’s manual for the specific switch operation and positions.
For example, a common configuration has three positions: “OFF,” “BATTERY 1 (Chassis),” and “BATTERY 2 (House),” or a combination of both. Remember to always double-check the switch position after making any changes.
Battery Switching Flowchart
This flowchart illustrates the process of switching between batteries using a typical three-position battery switch:[Imagine a flowchart here. The flowchart would start with a box labeled “Begin.” An arrow would lead to a decision box: “Is the switch in the OFF position?” A “Yes” branch would lead to another decision box: “Desired battery configuration? (OFF, Chassis, House, Both)”.
Each choice would lead to a box indicating the correct switch position. A “No” branch from the first decision box would lead to a box: “Turn switch to OFF position.” An arrow would then lead back to the “Desired battery configuration?” box. Finally, an arrow from each “correct switch position” box would lead to a box labeled “End.”]
Typical Dual-Battery Wiring Configuration
This table shows a common wiring configuration for a dual-battery setup in an RV. Remember that specific wiring may vary depending on your RV’s make and model. Always consult your RV’s wiring diagram before undertaking any electrical work.
| Component | Positive (+) Wire | Negative (-) Wire | Notes |
|---|---|---|---|
| Chassis Battery | Directly to vehicle’s starting system | Directly to vehicle’s chassis ground | Provides power for the vehicle’s engine |
| House Battery | Connected to the battery switch and then to the RV’s 12V system | Connected to the RV’s chassis ground | Powers the RV’s interior appliances and lights |
| Battery Switch | Connects the house battery to the RV’s 12V system based on switch position | Not directly involved in negative connection; typically chassis ground is used for both batteries | Controls power flow between batteries |
| RV 12V System | Receives power from the selected battery via the switch | Grounded to the RV’s chassis | Distributes power throughout the RV |
Safety Precautions When Working with RV Batteries, Battery switch on travel trailer function
Working with RV batteries requires caution. Always wear safety glasses and gloves to protect yourself from acid splashes and potential burns. Ensure adequate ventilation to avoid inhaling potentially harmful gases. Never connect or disconnect batteries while the engine is running or any electrical loads are active. Disconnect any negative (-) terminals first and connect them last to prevent accidental short circuits.
If you are unsure about any aspect of the process, consult a qualified RV technician. Remember, battery acid is corrosive and potentially harmful; handle with extreme care.
Troubleshooting Common Battery Switch Issues: Battery Switch On Travel Trailer Function

Dealing with a faulty battery switch in your travel trailer can be frustrating, but understanding the common problems and how to troubleshoot them can save you time and headaches. This section will guide you through identifying and resolving some typical issues. Remember, always disconnect the negative battery terminal before working on any electrical components.
Common Battery Switch Problems and Their Symptoms
Several issues can arise with your RV battery switch. A non-functional switch might leave you stranded without power. Low battery voltage, even with the switch seemingly “on,” points to a different problem altogether. These issues often manifest in subtle ways, so careful observation is key. For instance, a flickering interior light might indicate a poor connection, while completely dead appliances suggest a more significant problem.
Troubleshooting a Non-Functional Battery Switch
If your battery switch isn’t working, begin by visually inspecting the switch itself. Look for any obvious signs of damage, such as loose wires, corrosion on the terminals, or a broken switch mechanism. Clean any corroded terminals with a wire brush and baking soda solution. Then, carefully check all wire connections, ensuring they are secure and free from damage.
If the problem persists, you may need to replace the switch. This often involves disconnecting the battery cables, removing the old switch, and installing a new one, following the manufacturer’s instructions. A multimeter can be used to test for continuity in the switch to confirm whether it’s faulty.
Resolving Low Battery Voltage Issues
Low battery voltage, even with the switch in the “on” position, usually points to a problem beyond the switch itself. The most common cause is a parasitic drain—a constant, low-level current draw even when the trailer is not in use. This drain slowly depletes your batteries. To find the source, use a multimeter to measure the current draw with the battery switch turned off.
A significant draw (more than 50 milliamps) indicates a problem somewhere in the trailer’s electrical system. You might need to systematically disconnect circuits to pinpoint the culprit. Another possibility is simply insufficient charging. Make sure your charging system (converter/charger, solar panels, alternator) is functioning correctly and adequately charging the batteries. A weak or failing battery is also a common reason for low voltage.
Table of Potential Problems, Causes, and Solutions
| Problem | Possible Cause | Solution | Additional Notes |
|---|---|---|---|
| Battery switch doesn’t work | Loose or corroded connections | Tighten connections, clean terminals | Use a wire brush and baking soda solution. |
| Battery switch doesn’t work | Faulty switch | Replace the switch | Follow manufacturer’s instructions. |
| Low battery voltage | Parasitic drain | Identify and repair the drain | Use a multimeter to measure current draw. |
| Low battery voltage | Insufficient charging | Check charging system (converter/charger, solar panels, alternator) | Ensure adequate charging capacity. |
| Low battery voltage | Weak or failing battery | Test battery and replace if necessary | Have batteries load tested by an auto parts store. |
Mastering your travel trailer’s battery switch is a simple yet powerful way to enhance your RVing experience. By understanding its function, practicing safe operation, and performing regular maintenance, you’ll ensure reliable power, extend the life of your batteries, and avoid frustrating electrical problems. So, get out there, hit the road, and enjoy the journey knowing you’ve got your power under control!
Frequently Asked Questions
What happens if I leave my battery switch in the “off” position for an extended period?
Leaving the switch off completely disconnects your house batteries, preventing any power drain from accessories or appliances. This is generally safe, but remember to switch it back on when needed.
Can I use a battery switch to charge both my house and chassis batteries simultaneously?
It depends on your setup. Some systems allow simultaneous charging, while others require switching between batteries for charging. Consult your RV’s wiring diagram.
My battery switch feels hot to the touch. Is this normal?
A slightly warm switch is usually okay, but excessive heat indicates a problem. Check for loose connections, corrosion, or a faulty switch. If it’s excessively hot, disconnect and seek professional help.
How often should I clean my battery switch terminals?
Inspect and clean your battery switch terminals at least once a year, or more frequently if you notice corrosion or build-up. Use a wire brush and baking soda solution to clean them thoroughly.
